8 バックアップ元とバックアップ先を選択して、[OK]をクリックします。
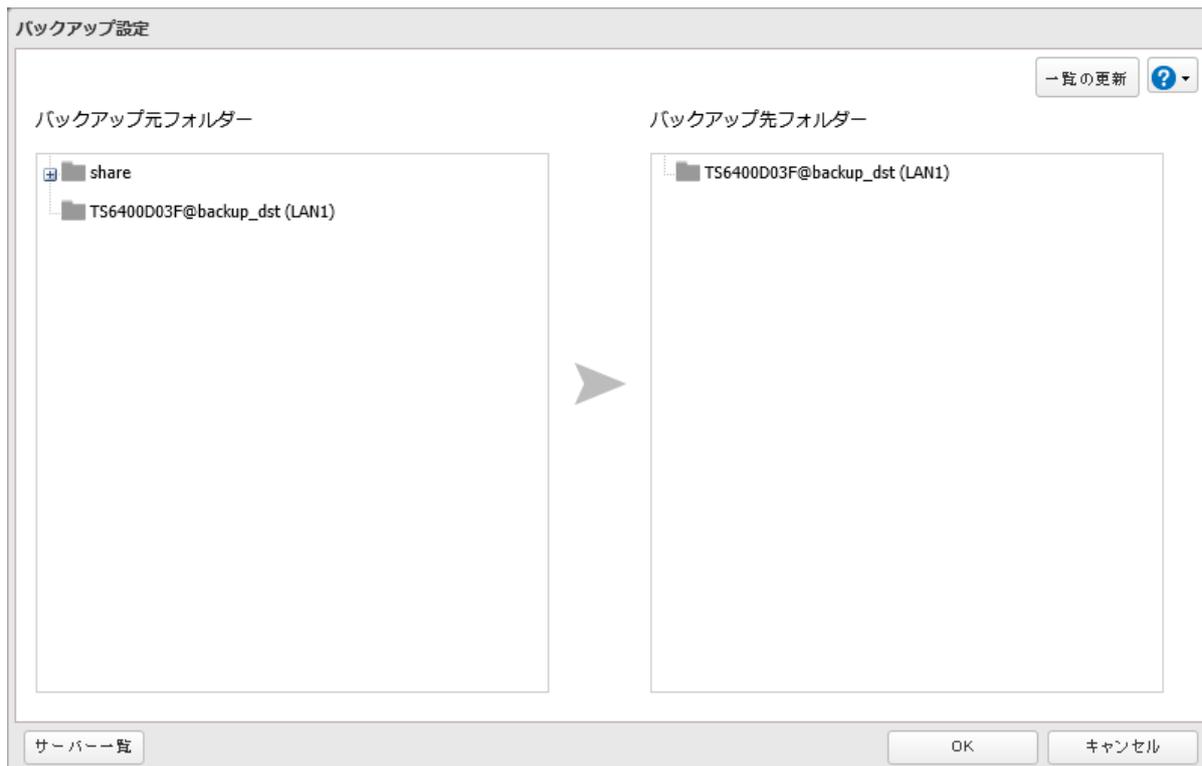
Screenshot of the 'Backup Settings' dialog box. The window is titled 'バックアップ設定' (Backup Settings). It contains two main panes: 'バックアップ元フォルダー' (Backup source folder) on the left and 'バックアップ先フォルダー' (Backup destination folder) on the right. The left pane shows a folder named 'share' and a network path 'TS6400D03F@backup_dst (LAN1)'. The right pane shows a folder named 'TS6400D03F@backup_dst (LAN1)'. A large arrow points from the left pane to the right pane. At the bottom left, there is a button labeled 'サーバー一覧' (Server list). At the bottom right, there are buttons for 'OK' and 'キャンセル' (Cancel). In the top right corner, there are buttons for '一覧の更新' (Update list) and a help icon.
メモ:
- • バックアップで使用するLAN端子(LAN3などで表示)を指定することもできます。
-
• rsync対応NASの共有フォルダーを使用する場合は、以下の手順で登録します。
- (1) [サーバー一覧]をクリックします。
- (2) [追加]をクリックします。
-
(3) 「rsync対応NASを追加する」を選択し、各項目を入力して[OK]をクリックします。
rsyncアカウントのユーザー名に記号を含まれる場合は、記号を含まないユーザー名に変更してから設定してください。 - (4) [閉じる]をクリックします。
- (5) [一覧の更新]をクリックします。追加したrsync対応NASが表示されることを確認します。
-
• 別のセグメントにあるバッファローNASやVPNで接続したネットワークにあるバッファローNASの共有フォルダーを使用するときは、以下の手順で登録します。
- (1) [サーバー一覧]をクリックします。
- (2) [追加]をクリックします。
- (3) 「バッファローNASを追加する」を選択し、「IPアドレス・ホスト名」に別のネットワークにあるバッファローNASのIPアドレスまたはホスト名を入力し、[OK]をクリックします。
- (4) [閉じる]をクリックします。
- (5) [一覧の更新]をクリックします。追加したバッファローNASが表示されることを確認します。
9 [OK]をクリックします。
以上で、バックアップタスクを追加する手順は完了です。作成したバックアップタスクは、「バックアップ一覧」画面表示されます。
メモ:
- • Jumbo Frameを設定していて、本製品のデータをほかのバッファローNASにバックアップするときは、2つのバッファローNASのMTU値を最も近い値に設定してください。